Table of Contents
ToggleIn a world where laptops seem to age faster than cheese in the fridge, it’s time to take matters into your own hands. Why settle for sluggish performance and outdated specs when a little DIY magic can breathe new life into your trusty machine? Upgrading your laptop might sound like a task only a tech wizard could tackle, but it’s easier than finding a Wi-Fi signal at a coffee shop.
Understanding DIY Laptop Upgrades
Upgrading a laptop offers an effective solution to enhance performance and extend the device’s lifespan. Many users find upgrades accessible and manageable, negating the need for expert intervention.
Benefits of DIY Upgrades
Improving a laptop’s speed enhances daily tasks, making applications load faster and improving overall functionality. Cost efficiency stands out since upgrading components typically surpasses the expense of purchasing a new device. Increased storage capacity allows for more files and applications, accommodating business and personal needs alike. Customization options empower users to target specific performance areas tailored to individual preferences or workflows.
Common Types of Upgrades
RAM upgrades boost multitasking abilities, allowing users to run more applications simultaneously without slowing down. Storage upgrades, such as transitioning from HDD to SSD, significantly enhance loading times for both the operating system and programs. Graphic card upgrades improve visuals, benefiting gaming and graphic design enthusiasts who require higher performance. Battery replacements often extend portability, ensuring the laptop remains functional throughout longer work sessions.
Essential Tools for DIY Laptop Upgrades
Upgrading a laptop requires specific tools to ensure effective and safe performance. Familiarity with the right equipment can facilitate the upgrade process, making it efficient.
Recommended Tools and Equipment
Screwdrivers are essential for opening the laptop case. A set that includes Phillips and flathead options meets various needs. Additionally, an anti-static wrist strap helps prevent damage to sensitive components. Pliers can assist with cable management or gripping small parts. A spudger, which aids in prying open laptop cases without causing damage, is highly recommended. Finally, having a good workspace with adequate lighting simplifies the process.
Safety Precautions
Taking safety seriously ensures a smooth upgrade experience. Always power down the laptop and unplug it from any power source. Workers should ground themselves using an anti-static wrist strap to prevent static electricity buildup. It’s crucial to handle components carefully, minimizing the risk of dropping or scratching them. Regularly documenting the steps taken during disassembly aids in reassembly. Keeping drinks and food away from the workspace helps maintain a clean environment. Proper ventilation also contributes to a safer work area.
Step-by-Step Upgrading Process
Upgrading a laptop involves a straightforward process that anyone can follow. Below are the detailed steps for each specific upgrade.
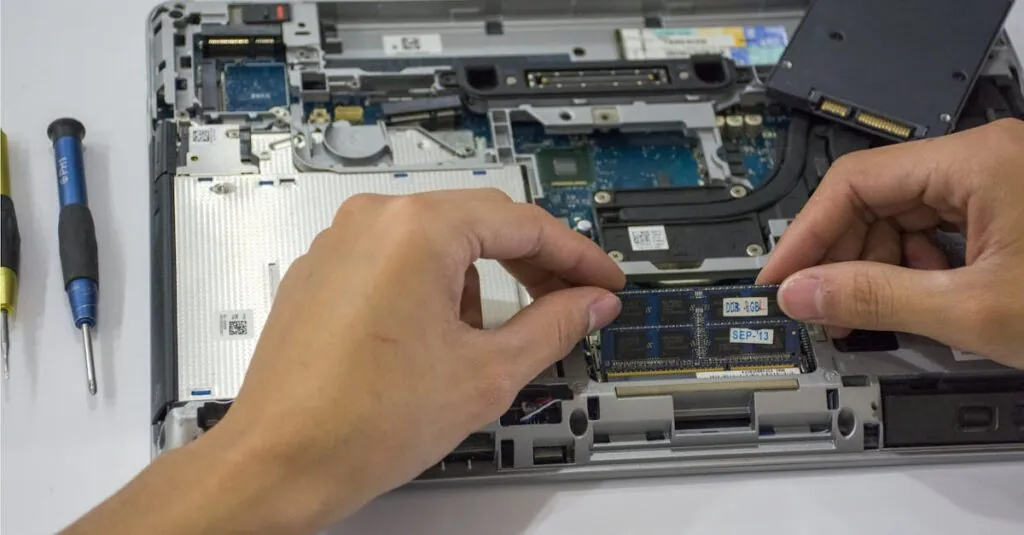
Upgrading RAM
Upgrading RAM boosts a laptop’s multitasking capabilities. Users often notice improved performance while running multiple applications. First, identify the maximum RAM supported by the laptop’s specifications. Then, power down the device and remove the battery if applicable. Access the RAM slots by unscrewing the panel on the bottom. Install new RAM modules firmly into the slots at a 30-degree angle and press down until they click into place. Finally, replace the panel, reinsert the battery, and power up the laptop.
Replacing the Hard Drive
Replacing the hard drive significantly enhances storage speed and capacity. To begin, ensure all data is backed up before proceeding. Turn off the laptop and remove the battery following safety protocols. Unscrew the back cover to access the hard drive compartment. Detach the old drive from its bracket and slide in the new solid-state drive (SSD) or upgraded hard disk drive (HDD). Screw it securely, replace the cover, and power on the laptop to format the new drive.
Enhancing the Cooling System
Enhancing the cooling system prevents overheating and extends laptop longevity. Start by cleaning dust from vents and fans using compressed air. Turn off the laptop and unplug it for safety. Access the internal cooling components by removing the back cover. Users may consider applying new thermal paste on the CPU to improve heat transfer. Installing additional or upgraded fans may also aid in better airflow. Finally, reassemble the laptop and ensure optimal operation with improved cooling efficiency.
Tips for Successful DIY Upgrades
Upgrading a laptop can yield significant improvements in performance and longevity. Following a few essential tips leads to successful DIY upgrades.
Research and Compatibility Checks
Understanding the specific laptop model is crucial. Consult the manufacturer’s website for upgrade specifications, ensuring compatibility with components like RAM and storage drives. User manuals often contain vital information about supported hardware. Checking forums or community discussions also provides insights from others who have upgraded similar models. Utilizing tools for compatibility checking simplifies the process, helping find suitable parts that fit device requirements. Accurate research prevents costly mistakes and ensures optimal performance from new components.
Testing After Upgrades
Post-upgrade testing verifies that changes function correctly. Monitoring system performance through benchmarking tools showcases improvements in speed and efficiency. Running diagnostic software helps identify any potential issues that may arise after the upgrade. Observing boot times, application load speeds, and overall responsiveness indicates the upgrade’s effectiveness. Ensuring that all components are recognized in the system settings confirms proper installation. Conducting stress tests allows verification of system stability under heavy workloads. Adequate testing guarantees that the laptop performs as expected, providing peace of mind post-upgrade.
Conclusion
Upgrading a laptop can breathe new life into an aging device. By taking on these DIY projects, users not only enhance performance but also save money and tailor their machines to fit personal needs. The confidence gained through these upgrades empowers users to tackle future tech challenges with ease.
With the right tools and a bit of patience, anyone can transform their laptop into a faster and more efficient machine. Embracing these upgrades not only extends the laptop’s lifespan but also enriches the overall computing experience. Whether it’s improving speed or increasing storage, the benefits of DIY laptop upgrades are undeniable.